In the previous post I talked about how to set up an application to run in the Windows Azure environment, and how to use Azure Storage for uploading files. (See the previous post.) In this post I will cover migrating a database to SQL Azure and deploying the final application.
Our site contains a Web Role to host the static pages of our site and a virtual application within the web role to host a version of BlogEngine.Net as our content management system. For storage we use Azure Blob storage for new images and files added by the content management system, and a SQL Azure database to handle the storage of the blog posts.
Preparing and Porting the Database
The BlogEngine.Net download includes a SQL script that can be used to set up all the tables and insert default values used by the application. The script is simple to run in SQL Server Management Studio or from any place you can run T-SQL. But since SQL Azure is still growing and not all commands or data providers are available, (see SQL Azure Guidelines and Limitations), you are faced with two options. The first option is to alter the T-SQL taking out all of the items that are not allowed and, making sure that all the tables have a clustered index. (it is required that all tables in SQLWindows Azure use clustered indexes.) The second option (and the one that we used for this project) is to create the database locally on a full version of SQL Server then use setting up Data Sync or use a third party application to move the database into the Azure environment.
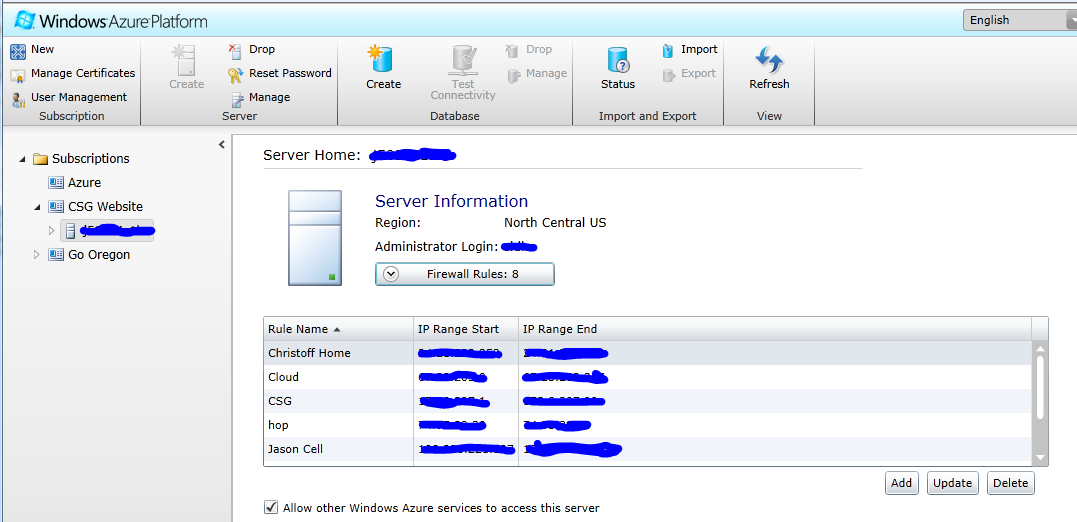
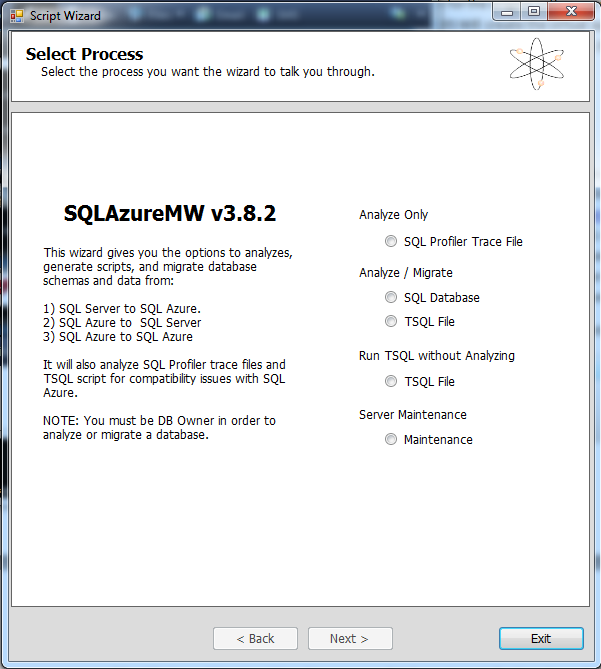
After creating our SQL Azure account and creating the database using the Windows Azure Portal, we used the SQL Azure Migration Wizard to copy our database since at the time Azure Sync was not available. While the Migration Wizard does not require an installation, you will need access to your local database, and opened your I.P. address in the firewall rules for the Azure Database you create.
Once this firewall is open the application will walk you through a few simple steps where you select what tables, views, and stored procedures you wish to migrate to your SQL Azure database. The application will create and run the SQL script needed to create the new items in your SQL Azure database and use the BCP utility to insert all of your current data.
Since the October 2011 release of Azure Data Sync Public Preview there has been a few minor updates and one major one in January 2012 that has brought Data Sync up to a point that is a great tool to use in the migration of your database to the cloud (and later keep it synced for on premise backups). Inside the Windows Azure Portal you can use a wizard to set up a Sync Group between your local database and the data base in Azure.
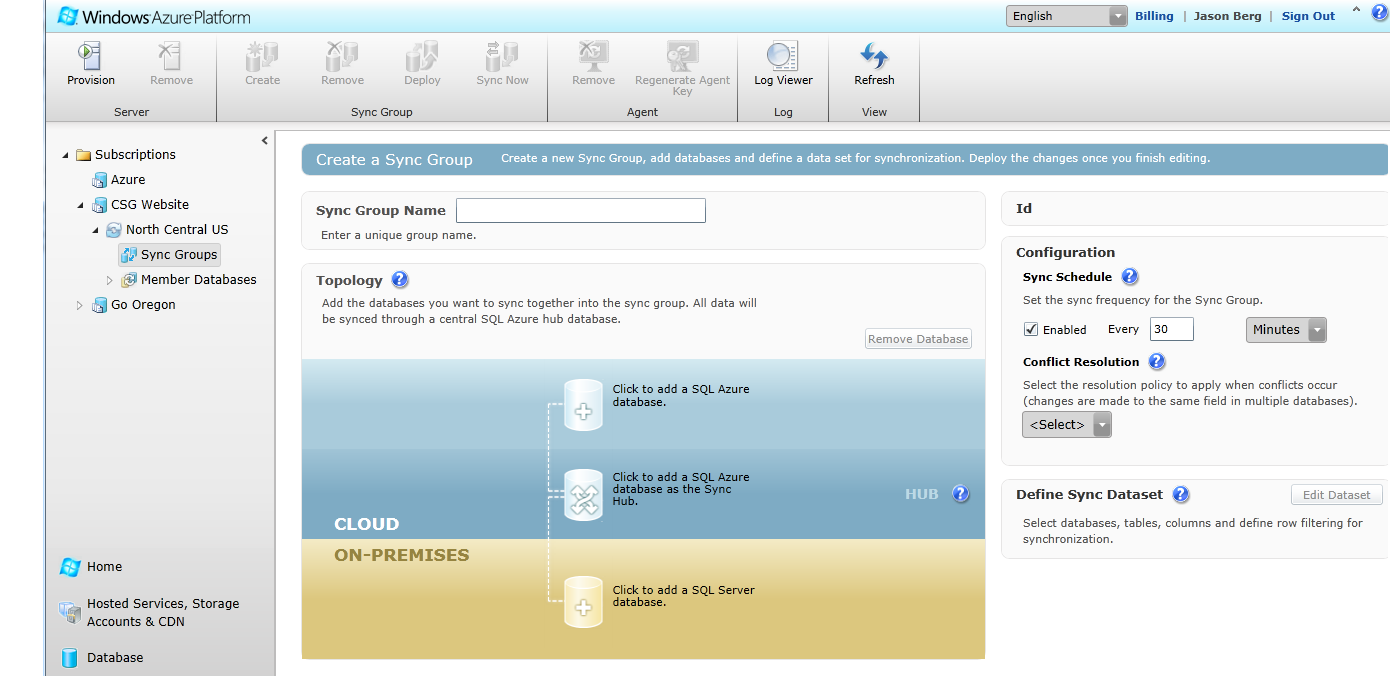
This wizard is one of the best wizards I have used in terms of simplicity and as a teaching tool for when you can just do it on your own. You will need to install a client application on your local SQL Server machine. This client uses a self-created key to handle access between the local SQL Server and SQL Azure. It is good to note that although you can set up Data Sync between local SQL Servers and SQL Azure servers you will always need to use a SQL Azure server as your hub.
Preparing the application for the cloud
After the Service Definition has been set up, all the programming on the roles to handle Azure Storage completed, and the database has been set up and migrated to SQL Azure the final step is to move the application to the cloud and enjoy. Well almost.
It is always best to try and run the application locally and debug inside of the Visual Studio Enviroment. Microsoft provides the Azure Compute and Storage Emulators so you can run the application locally and test then in a pseudo cloud. There are a few differences when running the emulator and the actual Azure cloud. Since we had already opened our local I.P. for SQL Azure Firewall access we do not have to change any of our SQL connection strings. While we could use our Azure Storage account while testing locally, we decided to use local storage so that we did not clutter up the storage we are paying for with useless items. To support this, the connection string will need to be changed from what we showed before to CloudStorageAccount.DevelopmentStorageAccount
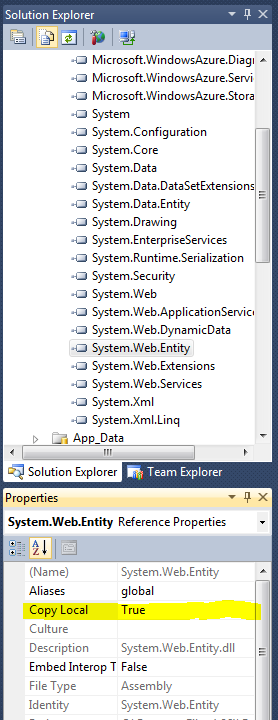
Finally, after testing, we are ready to deploy. Before we packaged up the site we needed to make sure that any non-default dlls (dlls that don’t come with the basic install of Windows Server and IIS) that we used where set to be deployed with our package. Your testing will not catch these dll’s because the Compute Emulator uses your local machine’s GAC. So dll’s like those used for RIA Services, or for BlogEngine.Net, need to have their CopyLocal property set to true.
Moving the application to the cloud
There are a number of ways you can get an Azure application packaged and up into the cloud. You can use command line utilities for automated build and deployment or by right clicking on your Azure project and selecting publish, you can set up the project to deploy directly from Visual Studio.
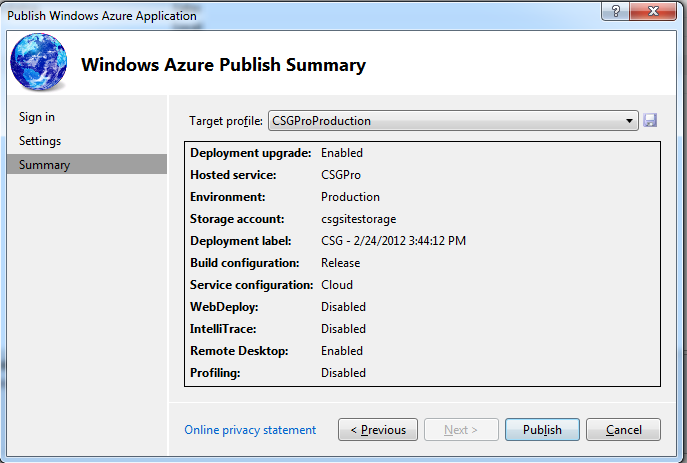
This method is useful when you want to configure Remote Desktop access and IntelliTrace debugging on your application. The deploy package is first moved into Azure storage and then deployed to your instance.
The third method and in many ways the simplest, since it does not require you to create any certificates or additional configuration, is to create the package files and then upload them to your staging instance for your app. Below are the two files that are created when running the ‘Package’ command in Visual Studio.

After the files are created locally you can login to the Windows Azure Portal and go to the Hosted Service section and click on the ‘New Hosted Service’ Button. This will bring up this dialogue.
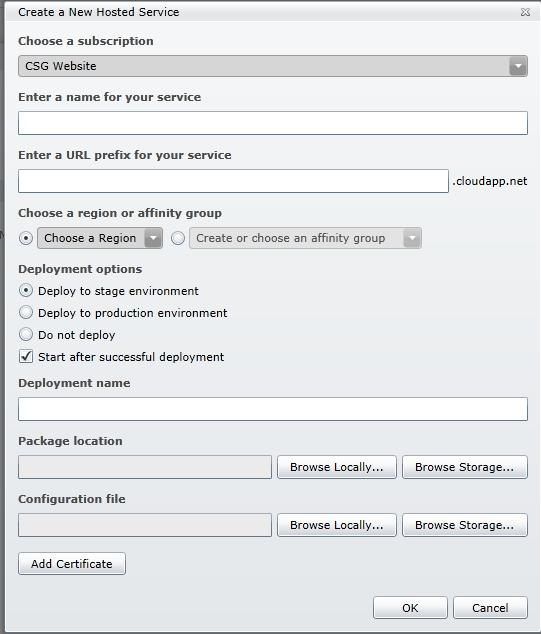
You will need to ‘Browse Locally’ to the location of the package and configuration files that Visual Studio just created. At this point you can also choose the region that you wish to deploy to. We chose North Central US so that it will be as close as possible to the majority of our customers. After you hit “OK”ok the files are uploaded and the instance is started. If everything goes well, after a few minutes you will be able to browse to your application with the external Azure URL http: //NameorKey.Cloudapp.net. Updates are handled in a similar manner, but you are not allowed to change key points of metadata in the instance. You will just be allowed to upload the two main files.
Finally, we preferred to use our own domain and not the CloudApp.net domain, so one final step was required to open the site to the public. We needed to make a CName entry into our domain’s DNS registry. (more on that here) After creating the necessary DNS entry, Windows Azure provided a seamless hosting environment for the CSG site.